
They grow so fast…
When we originally moved into our new home, our boys were 18 months and 3-and-a-half years old. Like every mama on a budget, I was out to make our house a home…on the cheap. I found some adorable Curious George art on a local garage sale site, and made a cornice out of this cute yellow and white chevron fabric from Hobby Lobby. My handy husband hung the cornice for me, and I added a tension rod to the inside with a pair of inexpensive Walmart sheer curtains. I grabbed a few of Ikea’s down pillow forms and a few more primary patterned cotton duck fabrics. My mom helped me make pillow covers, and kazaam, the boys had a cute and fun playroom.
Well, fast forward and now the kiddos are 9 and 7 years old, fast approaching ages 10 and 8. A little too old for George, I decided one day as I looked around the toy loft. Once I could finally convince my 7 year old that the change was ok, I started daydreaming and pinteresting on how to redo the loft without too much expense.
My older son, the engineer, loves blue, and our younger son, the artist, loves red. I really didn’t want to change the cornice, as it is kind of a pain. So I decided to try to keep to that primary color scheme without getting too ‘little kid’ looking.
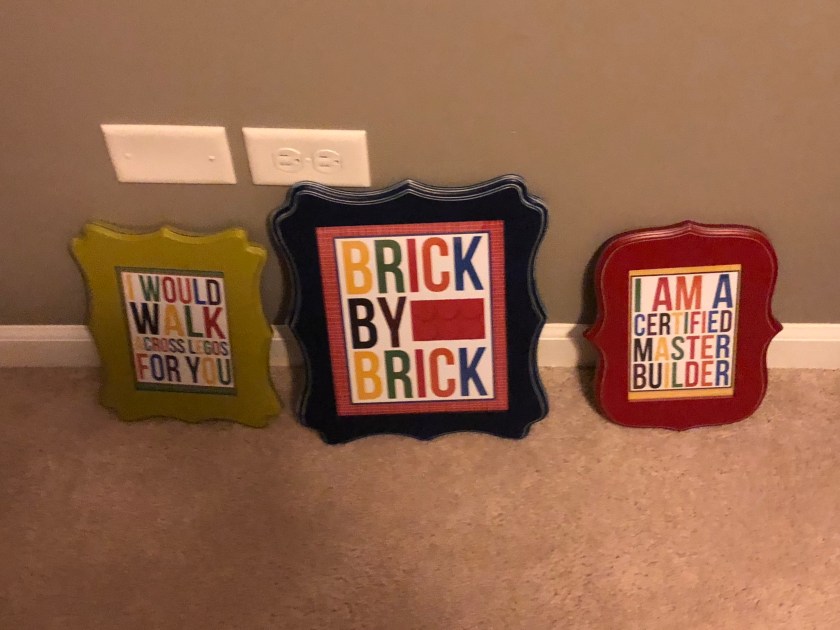
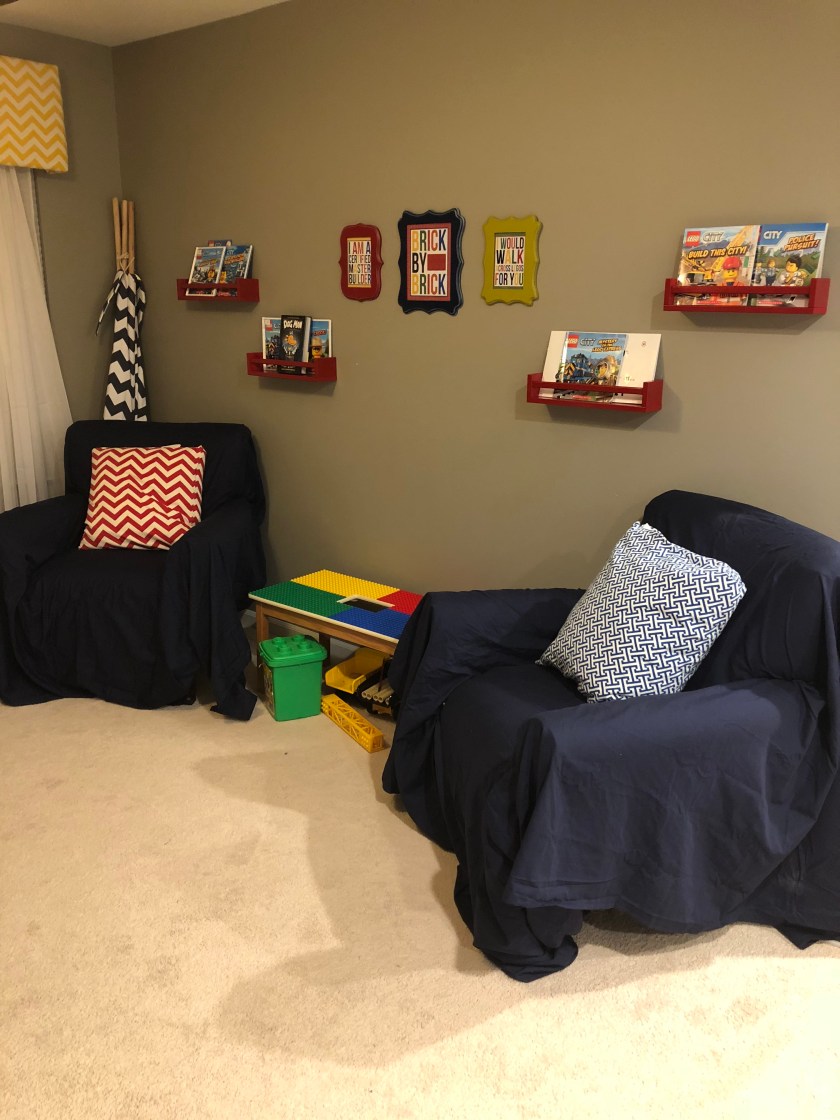
First, I remembered these free lego art printables that I had seen a few years back and pinned. I ended up printing these through Costco photo center, and putting them in some shaped frames I had lying around waiting for a home.
Then, digging through things in the basement, I found our old Ikea shelf from our closet in our townhome. I had come across this blog post showing how to give the brackets a more industrial look. I went ahead and followed the instructions, and painted the brackets. I ended up just using the shelf we had instead of making our own because we already had one…and it matched this dropdown desk that I had squirreled away in the basement waiting for a proper home.
One of the projects I have always wanted to include in our loft, but had not accomplished yet, was to have book shelves for the kids that allow the front cover to face out. My neighbor had done some cute ones by painting spice racks from…yup, you guessed it…Ikea, so I borrowed that idea and spray painted ours red.
I ended up ordering some bigger chairs to go on either side of the drop down desk so that the boys could sit and play a game or build with legos on it. I found these on sale at Target for $79.99. I liked that they were a little ‘older’ looking, and with metal construction I felt like they would hold up to wear and tear well. I ordered the navy blue to go with the color scheme.
We had some nice upholstered chairs that we needed to clear out of the great room to make room for a recliner, and although they are extremely comfortable to sit in, they are a hideous and very particular golden brown color that is hard to match with…well, most anything. I had tried ordering slipcovers, but they were so expensive for how poorly they stayed in place, and it didn’t look much different than throwing a sheet over it (see below).
Which made me think, “…why don’t I put them in the toy room and literally throw a sheet over them?” I had recently seen a post from Must Have Mom on $5 twin flat sheets from Walmart used as curtains and thought, I will order a few sizes and take a run at a budget slipcover. It ended up they had them in navy, so I picked up two sizes, a full and a queen for each chair since I didn’t know which would work best. I believe they ran about $9.50 and $11.50 respectively. I ended up keeping the full sheets, so I ended up paying $20 for ‘slipcovers’ for two chairs. They do not look perfect, but they do not look any worse than the slipcovers I ordered online for $40-$50 a piece. I just tuck them in every now and then, and I have found that a sheet is decidedly easier to tuck into an upholstered chair than a thicker, manufactured slipcover. They also are much easier to wash, and cheap to replace if they get ruined or we want to change the look.
I am still considering sewing tabs or buying mitten clips to put on the back of each chair and on the arms to custom fit it a little better. But I am not too concerned about it, because the boys really just want a place to curl up and read, and could care less how it looks.
The kids like to keep their lego sets separated, and I had a vision of baskets on the shelf above the table so they could keep things organized. They could easily be pulled down to play and put back up when it is clean up time. I stumbled onto red wire baskets in Target’s dollar spot one day and snagged a bunch of those to put on the shelf and sort the boys’ different sets into. We also scored an awesome Lego CD player/radio at a used furniture store that found a home on the shelf. We went in to look for a coffee table and came out with no coffee table, a huge blue lego…and two excited kids. We made sure to test it in the store to see that the radio and the cd player were in working order. And it was blue, so The Engineer was super happy.
My awesome husband set aside some time on a Saturday afternoon to help me hang the drop down desk, Ikea shelves, and Ikea spice rack-turned-bookshelves. After everything was hung, and we both sat in the comfy chairs while the boys built at the lego drop down table, and my eye fixed on the blank space of wall between the table top and the shelf. And then I remembered something the boys had gotten all excited about when we were watching Fixer Upper one night: a lego wall. Now, Joanna and Chip don’t do anything small scale, and this was one ‘all out’ lego wall. We couldn’t afford to do an entire wall on my budget, but it gave me an idea…I had bought an Ikea magnet board a while back and not used it for its intended purpose. And there it sat, waiting to be returned…and a light bulb went off. I turned to my husband and said…what if we use that magnet board as a small ‘lego wall’? His eyes lit up (I always get so excited when he gets as excited as me about an idea!). I searched online and found peel and stick lego style baseplates on Amazon.
When I held up the magnet board above the drop down desk, I didn’t like the look of the shiny silver metal with the bronzed brackets for the shelf above. So I took it outside and gave it a light sanding, and used the leftover spray paint from the brackets just around the edges of the magnet board where it would not be covered by the lego plates. I did wear a mask, just to be safe…not sure what kinds of chemicals are being released in that dust!
Then my guy followed the instructions on how to cut the baseplates to size before I did the peeling and affixing. We did end up having to sand down one of the cuts on the baseplate, where it just would not lay flush against the others surrounding it. But after some sanding of the baseplate and again on the magnet board, I wiped both with a damp rag. After allowing them to dry thoroughly, I used legos to patch the board pieces together in the shape we needed. This is an important step, as it ensures that the plates line up in a way that will allow for building across seams.

Then I removed the backing and adhered the baseplates by the manufacturer instructions. We hung it the next day and the boys are now in Lego heaven. My older son is poised and waiting to affix his removable lego tape to the edge of the desk, shelves or anywhere else he can find space.
